This post may contain affiliate links. Please read the disclosure for more info.
A home’s HVAC can mean relaxing warm winters and cool summers, but it also can impact the overall longevity and health of your home. In my years of home remodeling, I have accepted that the HVAC system is a key critical component of the home that needs to be maintained and serviced regularly. Give the HVAC system the TLC it needs. Read on to learn how to maintain your home’s HVAC system so that it keeps your home healthy and avoid costly repairs later.
How to maintain a home’s HVAC? It starts by understanding what makes up a home HVAC system and what critical components need your attention for proper maintenance.
- Be sure to change your home air filter.
- Visually inspect your home’s internal and outdoor components for debris, damage, or leaks.
- Make sure your drainpipe is flowing and free from any blockage which could cause a backup and water to leak in your home.
- Don’t be afraid to call in a professional if you are not comfortable with the regular maintenance. A call to an expert now can save you thousands in the long run.
- Be sure to check out the DIY Round Table article on How to prepare your air conditioner for summer
With these critical points covered on how to maintain your home’s HVAC system, let’s move on to further details on your home’s HVAC system.
Jump To:
What makes up a home HVAC system?
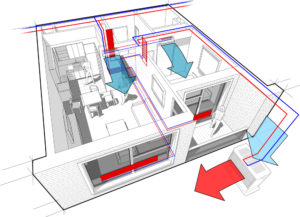
This topic would be much longer if we covered everything, but I wanted to include a few main key points when it comes to a home’s heating and cooling system and what maintenance you should perform. For this topic, we are talking about heating, ventilation, air conditioning systems, also known as HVAC with ductwork.
A homes HVAC system has the following components: thermostat, boiler or furnace, supply and return ductwork, ventilation to the outside for dangerous fumes, air filter, blower, and connections to the outdoor condenser.
- For home heat and air conditioning, your thermostat will signal to your HVAC system to create the hot or cool air depending on your settings. We will speak more about setting a thermostat later in the article.
- For heat, you just need to know that the heat exchanger in the furnace or boiler, is where the heat is created that will heat the air that is flowing from the blower through the ductwork. A word of caution is that a heat exchanger can wear out over time and cause dangerous carbon monoxide to escape into the home. Therefore, ensure your home has a carbon monoxide detector which we will cover later. If the heat exchanger is damaged, you will be better off replacing the entire furnace due to the cost.
- For cooling, it is important to know that the air flows through the coil which removes the heat from the air and sent through refrigerant lines out to a condenser unit that removes the heat from the refrigerant lines and flows back inside to the coil. This removal of heat from the air is what causes the cool air to circulate through the home. Many people believe the home air is being cooled when the heat is being removed from the air.
- The ventilation system is very important, and its main function is to carry harmful gases outside and away from the unit. Some gases are exhausted to a chimney or with higher-efficiency units they are directly vented outside the home.
- The ductwork is how air is supplied throughout your home and returned to the HVAC system for further heating or cooling. Be sure to check your ductwork regularly for any leaks which can rob your system of its efficiency. You can easily seal ductwork with aluminum foil tape and other products found at your home improvement store.
- The air filter is another component which needs regular attention. A clogged or dirty air filter can reduce the efficiency of your HVAC unit and the overall life of the unit since it must work harder than it needs to. You should change your air filter every 90 days or when you inspect it and its dirty. In the summer months, I change it much more frequent, almost 45 – 60 days, due to pollen and other debris in my region that gets in the air to clog the filter.
How to replace an air filter in the HVAC system?
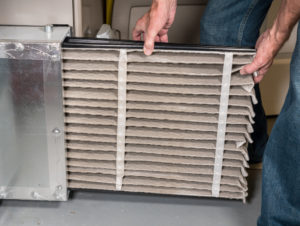
- It’s a good idea to turn off your HVAC unit before removing the air filter; especially if you need to remove panels to access it.
- The air filter is usually right after or near the return ductwork and installed, so the air filter will filter the incoming return air and cleaning it before it goes into the supply ductwork.
- Take note of the direction of the filter is installed and the size of the air filter. Take pictures with your phone if needed.
- Most air filters have an arrow indicating which direction the air is flowing, and most air filters have the dimensions printed on the side of the air filter.
- Some air filters can be removed, cleaned then reinstalled while others need to be fully replaced.
- Once you have purchased a new air filter or cleaned your current air filter, you need to install the air filter in the same way with the air flow arrow pointing in the same direction as the old air filter.
- Replace any panels that were removed.
- Turn on the HVAC.
- You can buy HVAC filters at Home Depot or LOWES – links
What are typical home HVAC repairs?
- Leaking refrigerant – If your air conditioner begins to operate less efficient by not cooling or dehumidifying your home’s air, it could be a sign that you have a leak or a recharge in your refrigerant. If undetected or neglected a condenser operating with the wrong or low amount of refrigerant, it can lead to more systematic issues. I leave this job to a licensed professional since most states require a certification or license to buy and handle the refrigerant required to service the condenser.
- Electrical failures – There are many factors that can contribute to electrical issues for the HVAC operability. Often this is due to overuse or improperly sized equipment which can lead to accelerated wear and tear on the equipment. These issues can be tricky to diagnose and are best left to a professional.
- Thermostat malfunctions – A home’s HVAC thermostat can impact how effective and efficient the equipment is operating. If you have a faulty thermostat, the heat can stay on, or the cool air won’t turn on when you want it to. This is an easy issue to diagnose and often requires a new thermostat to be installed. Before installing a new thermostat, I would suggest you first disconnect the face plate and inspect the wires or batteries. Sometimes the wires can come loose, causing the thermostat to not operate as desired. Fixing the wires or replacing batteries is a quick, cheap fix. If that doesn’t work, you can use this as an opportunity to switch out your existing thermostat and opt for a newer smarter thermostat.
- Imbalanced dampeners – If your home’s HVAC system has ductwork, it is possible that there are dampers that are helping balance out the hot or cold air. A damper will help regulate the flow of air from one room to another, which will help with the overall comfort of the air temperature in the home. Some are manual while others can be motorized. In my prior home, we had a manual damper to control the flow of air depending on winter or summer, and it was as easy as changing that damper two times per year to ensure the home had the right temperature balance. If you are experiencing a significant difference in temperature, it may have to do with a damper needing attention. Check them before calling a professional.
How to clean your home’s HVAC ductwork and vents?
If you keep your home’s HVAC system air filter clean as described above the ductwork should not get very dirty. If you notice dust in the air when your heat or air conditioning unit turns on, it may be time to clean the ductwork and vents. Since your vacuum probably won’t have a 100-foot hose and you don’t want to pay a professional $150 – $200 to clean your ductwork you need to know you won’t be able to reach every part of the ductwork, but you can get it about 80% clean.
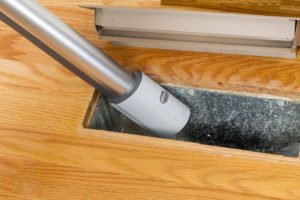
Follow these simple steps to do-it-yourself HVAC ductwork cleaning:
- First, cover the supply vents or registers with tape so that dust won’t be circulated into the room and system. I use tape so the dust will stick to it making it easier to clean. If you do not have tape you still should cover the supply registers with a towel or other material.
- Shake gently or knock the ducts around to move dust into the system which will be captured by the air filter or sucked up by the vacuum.
- Remove and clean the registers.
- With the registers removed feed a vacuum hose into the register and ductwork to suck up any debris or dust.
- In the trunk or plenum of ductwork, you may wish to remove some takeoff or ductwork for a more thorough cleaning. This is based on your comfort level.
- With the HVAC unit off and the power off you want to clean out the blower of the HVAC system.
- You may need to remove the screws holding on the panel.
- Replace filter, registers and any ductwork you may have disconnected.
- Turn on the power and HVAC system to begin normal operation.
There are many reasons to clean the air ducts in your home such as efficiency, cleaner air and overall home health.
How much does a home HVAC cost?

Asking how much an HVAC system costs is very much like asking how much is a new car?
The simple answer is, it depends. The average costs for an HVAC system with installation can vary greatly depending on the brand, SEER rating, size of the home, number of floors, and other installation challenges.
On average a brand-new HVAC system installed with new ductwork will cost between $8000 – $10000.
Don’t forget to plan for unforeseen expenses like permit costs, possible lead or asbestos, plumbing, electrical, or framing issues.
How to ensure your attic has proper R-Value insulation?
- Insulation effectiveness is measured by R-Value, which is a measurement of the resistance to heat flow through a given thickness of the material.
- The higher the R-value the more effective the insulation.
- There are several types of insulation, each with their own R-value and thickness.
- According to the department of energy;
- if you live in a hot climate you want to target an R-value of 30,
- if you live in a cold climate you want to target an R-value of 49, and
- if you live in moderate temperate climates you can get away with an R-value of 38.
- To achieve these R-values, it depends on what insulation you are using.
- For example, if you choose to use fiberglass batt insulation it has an R-value of 11 for 3.5” of insulation.
- To achieve an R-value of 30 you would need 9.5” of insulation which can cost on average $0.40 per square foot.
- You can choose other kinds but ensure you have the measurements of your attic space, depth of the floor joists if exposed and the current depth of existing insulation.
- You can use a ruler or measuring tape to check. This total depth would need to be at a minimum 9” to achieve the recommended R-value of 30 if you live in a warmer climate but over 15” if you wanted the R-value of 49 in a colder climate.
- If you are interested in getting quotes you can call in a professional who can take the measurements and provide the costs for several options on the type of insulation and different solution to meet your needs.
Why should you ensure exhausts are not blocked?
- You want to ensure your exhaust fans are operating as designed to remove harmful gases, fumes or air from the home.
- Most exhaust fans are not easily accessible, so you may want to enlist the help of a friend or a licensed plumber to inspect them.
- Attic fans, dryer vents, kitchen exhaust fans, HVAC exhaust (direct vent or chimney) all need to be inspected at least once per year to ensure they are not allowing harmful gases like carbon monoxide to escape into the home or allow flammable lint to escape into the air.
- All of these can be harmful to your family and home if left untreated.
- You also want to go outside and inspect where the exhaust is leaving your home to ensure there are no obstructions, and it is operating normally.
- Be sure to check out the DIY Round Table article written on how to test your carbon monoxide and smoke detectors.
How to set your home’s thermostat?
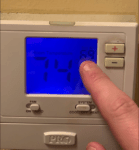
- Start by reading the owner’s manual if you still have it. If you do not, you can use the model number and look it up online since most are available for free to download.
- You will want to be familiar with what parts of your home the thermostat is controlling; heating, cooling or both.
- Most thermostats consist of the following: fan (on or auto), hot, cold or off, display or indicator showing the current temperature and the desired temperature and an up and down button for setting the desired temperature.
- The fan on button is generally not used since it will have the fan running constantly. Keep this on auto.
- For system hot or cold it is based on where you live and the season. If you desire the home to be cooler set the system to cold, likewise, if you desire the home to be warmer set it too hot. This will tell your system to heat or cool your home which will switch on components like the heat exchanger or condenser depending on what setting you chose.
- Once you set the fan and the system to hot or cold you can use the up and down button to set the desired temperature. If you want the home hotter and it’s set to hot you press it up to the desired temperature. If you want the home cooler and its set to cold you press it down to the desired temperature.
- This is very basic thermostat but nowadays there are wi-fi smart thermostats that will learn from your preferences, know when you are home and can adjust the temperature settings automatically. You can even control them from your smartphone if desired.
Conclusion:
I am glad you have decided to tackle the maintenance of your home’s HVAC system. I am sure you will find this article helpful and please feel free to leave a comment below.
Be sure to like and follow us on social media.
Here are some related DIY Round Table posts: