This post may contain affiliate links. Please read the disclosure for more info.
We all like our finished product on projects around the home. In this article we will discuss one of my least favoring but most rewarding projects; preparing walls, repairing walls and priming and painting walls. This is not my most enjoyable task, but it gives me the most reward because it is a finished step. After this, there is nothing else to do but sit back and admire it. By following these simple projects you can get your room ready for furniture, hang some pictures and cross another item off the to-do list.
When it comes to preparing your wall for paint you want to start by ensuring all holes or imperfections are spackle, sanded and clean. Then, give the wall a good wipe down with some warm water and soap. Before starting to paint you want to ensure you lay down some floor coverings, tape off windows and trim. Now that your area is prepped, free and clear of defects you can start to prime. After you have primed the ceiling and walls, you can apply your first coat of paint. After that dries you can put on a second and possibly third coat.
Many factors go into how well your paint will adhere to the wall and the overall results of your final project.
In the next few sections, we will discuss several ways to ensure your final product will wow your visitors, help you save money and ensure you can keep crossing those to-do items off your list!
Jump To:
How to prime and paint a wall?
Here are 11 steps to prime and paint a wall for a flawless finish!
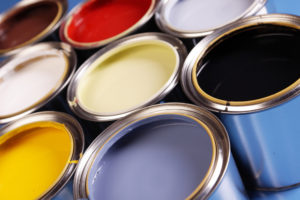
- Oil or Latex: All household paints come in either oil or latex. Latex is the best choice for all interior surfaces except metal. For metal surfaces, you must use oil paint. Oil paints smell much worse than latex, can cause allergic reactions in people and are harsher on the environment. Latex paints do not have a horrible smell and will dry quicker. Some professional painters will argue oil paint is more durable I have not found that to be true even when using latex paints on baseboard molding that take a beating.
- Primer is used to prep the surface before painting to ensure the paint will adhere to the surface and cover the surface properly and evenly. It is best to prime before any painting job unless you are using painting a surface with the same finish and a similar color.
- To determine how much paint or primer to buy you multiply the height x the width for each wall and add them together. This will give you the amount of area you are painting per coat. If you are planning two coats, then make sure you double that number. A general rule of thumb is lighter colored paints will need two coats assuming a primer was used while darker colors will need more coats. You will also need more coats if you are painting over a dark color with a lighter color.
- To protect your home while you paint you will want to consider removing all furniture from the room to be painted and lay down drop cloths, resin paper or plastic on the floor while taping off windows, moldings, and fixtures.
- To purchase brushes and rollers I believe this is a personal preference. I have not had any more luck with expensive brushes or rollers, and I have had better success and comfort using some of the cheaper products at the big box stores.
- Before using your roller get some painters tape or other tape and put in on the roller to help remove any lint. Remember the roller nap is the thickness and the higher the number the more visible the “orange-peel” pattern will be on the wall.
- Before painting makes sure your wall is free from defects, is clean and smooth. If you need to patch any holes review this information before starting to paint.
- Prime everything first. After priming, you will want to paint the room starting with the ceiling, then the walls and finish with the trim around the doors, windows, and floors. Tip: Do the door trim last so you avoid hitting it.
- With any wall or ceiling, you want to start with “cutting” in which is painting the perimeter first.
- Follow with rolling the large flat surface, blending any overlap between the brush and the roller.
- Once all that is done you want to store the paint and brushes accordingly.
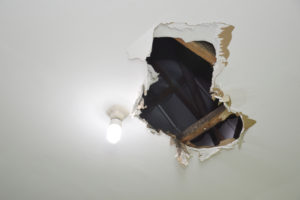
How to repair a hole in drywall?
Drywall, sheetrock, gypsum board all mean the same thing. It is the most popular material to put over the interior walls or ceilings and is fastened to the studs with nails or screws.
While drywall is easy to install it is easy to damage. To repair drywall we use a compound called spackle or joint compound. It will be used to fill seams, cracks, gaps, damages in drywall and will harden as it dries. You can then sand, prime and paint it to make the drywall look like it did before it was damaged. As a homeowner you will need to make a repair in drywall and here is how.
- For small holes (1 inch or less) apply joint or spackle compound using a spackling knife. Let it dry, apply a second coat and or third coat to account for any shrinkage, sand it, prime and paint. See painting below
- For nail or screw pop holes do not just cover with joint compound. This is a short-term solution and you will find yourself fixing it again soon.
- To repair nail or screw pop holes in drywall you want to first drive drywall screws above and below the nail or screw pop, then if the drywall has popped out around the nail or screw pop you want to use a utility knife to cut out drywall, if it is flat then you do not have to do anything.
- Then apply joint or spackle compound using a spackling knife. Let it dry, apply a second coat and or third coat to account for any shrinkage, sand it, prime and paint. See painting steps
For big holes, you will want to use a self-adhesive drywall repair patch kit which is sold at big box stores in various sizes. Apply the self-adhesive patch over the hole and cover with a thin layer of joint compound. Ensure the compound is smooth and let it dry. Repeat this step 3 or 4 times while extending each coat a few inches beyond the previous coat. This will ensure you have built up a solid layer of compound and properly tapered edges.
Sand the joint compound.
Prime and paint. See painting steps
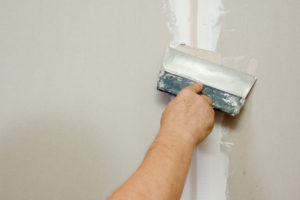
How to prepare a wall for painting?
As a new homeowner you need to prepare your walls for painting so be sure to follow the next few steps for success:
- To protect your home while you paint you will want to consider removing all furniture from the room to be painted and lay down drop cloths, resin paper or plastic on the floor while taping off windows, moldings, and fixtures.
- To purchase brushes and rollers I believe this is a personal preference. I have not had any more luck with expensive brushes or rollers, and I have had better success and comfort using some of the cheaper products at the big box stores.
- Before using your roller get some painters tape or other tape and put in on the roller to help remove any lint. Remember the roller nap is the thickness and the higher the number the more visible the “orange-peel” pattern will be on the wall.
- Before painting make sure your wall is free from defects, is clean and smooth. If you need to patch any holes do so beforehand by reading this article on repairing holes in drywall.
- Use a warm bucket of water, with soap and a towel to wipe down the wall, trim, and edges to ensure it is free from dust, or dirt.
- Let it dry.
- Sand the walls lightly with 220 grit and prime the walls.
- Before using paint or primer you want to ensure you strain it. Straining paint and primer allows you to remove any dried areas that fell inside it when you opened the lid. If you paint with these dried pieces you will see them as bumps on the wall. To strain the paint or primer you will need a 2-gallon bucket, a strainer, and a stirring stick. Stir the paint or primer. Start by placing the strainer over the 2-gallon bucket and slowly pouring the paint or primer into the 2-gallon bucket through the strainer. Any dried pieces will be left on the strainer.
- You can then pour the paint or primer back in its original can.
- Proceed with painting or priming the wall. See painting above
How to identify mold and when to call a professional?
Mold needs moisture to exist. There are three main causes to mold; water entering the home from the walls, ground, roof, windows, pipes, appliances, or condensation which can be produced by hot showers, or when any warm air contacts cooler surfaces.

Keep in mind that mold can be a sign of a possible bigger issue. If caught early mold can save a homeowner from a much more devastating situation.
First, you want to identify if it is mold or dirt/buildup. To test it you can use a cotton swab dipped in bleach. Gently dab the spot you believe is mold with the cotton swab and if it lightens up quickly or keeps coming back then assume it is mold.
Most mold and mildew can be treated with a mixture of water and bleach in a 3:1 ratio.
Keep in mind not all mold is deadly, but all mold can impact human health. That is why if you see a large amount of mold it is always a good idea to call in a professional.
If you have a small stain and plan to tackle the removal yourself ensure you have eye, hand and breathing protection. Remember respirators are not all created equal and you should get one that will prevent the mold spores from entering your lungs.
If you are in the process of demoing a room and you see a large portion of mold immediately remove all animals and humans from the home and call a professional. Mold spores in the air can be breathed in or make their way into the ductwork and thrive. This can create a much more costly and dangerous scenario.
How to locate a stud?
Every homeowner will need to know where the studs are located behind their finished walls for numerous reasons.
For clarification, a stud is a vertical wood or metal framing member that allows the sheetrock to be attached to the walls and ceilings.
A general contractor rule of thumb is to place the studs every 16-inches (usually on center) to build the wall.
There are several methods to finding a stud, but the easiest is using a stud finder for wooden studs. A wooden stud finder senses the density behind the wall to determine where the wooden studs are as you sweep left and right while holding down the button.
Keep in mind this tool is not perfect and while technology is getting better a stud finder cannot tell the difference between a wood stud, a piece of the ductwork or a pipe.
A stud finder can only work to a depth of 3/4” to 1“, which means, for most, 1/2″ sheetrock walls and ceilings a stud finder will work fine, but for plaster walls which are usually much thicker, it may not work.
Use a sixpenny nail to double check that your mark is at a stud by hammering it into the wall. If there is no resistance and the nail goes all the way in, you are not at a stud and will need to move to the left or right and try again.
You can also use a magnet to sense metal studs, or the nail/screws used to attach the wall or ceiling to the studs.
It is a good rule of thumb to have a checklist for locating a stud so use all or any of the ways listed here to ensure you have successfully located a stud.
How to install a wall anchor?
There are various types of drywall anchors which you can read more about in this article (Various types of drywall anchors)
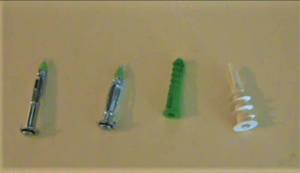
Almost all of them will require drilling a pilot hole into the wall material to allow for a plastic or metal anchor to be inserted into the hole. The size of the drill bit and pilot hole will depend on the anchor you choose.
Once the anchor is inserted into the wall a screw is attached to allow the anchor to expand providing holding strength for the object being attached to the wall.
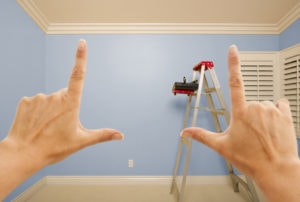
How to hang picture frames?
To hang frames there are several guidelines to keep in mind. Hang the center of the frame at eye level or 57 inches from the floor. If hanging more than one frame you may want to lay out a design on the wall using paper, laser level, and tape to ensure you have a plan.
Once you know where each frame will be positioned, and you have marked the layout/locations on the wall follow the next several steps to professionally and safely hang the frames.
These steps assume the use of picture hanging wire and pro-style picture hooks which are safer and easier to work with for leveling and positioning the frames on the hangers. However, there are many styles of hardware on the market for hanging frames and many steps below still apply for the layout and positioning of the frames.
For a non-oversized single picture frame (usually no bigger than 14×11 inches) and not aligned to others on a wall you can use a single pro-style picture hook, nail it to the wall and hang the frame.

If you want to hang a frame larger than 14×11 inches you will want to use two pro-style picture hooks. For heavy pictures, you want to ensure you are using a stud to secure the frame to the wall.
First, you want to find the hanger locations for each frame. Flip the frame over and use your fingers to stretch the hanging wire on the frame, toward the top of the frame. Measure the distance between each side of the frame and your finger locations. Then measure the distance between each finger location giving you the placement for two picture hooks.
Transfer these measurements to the wall.
Align the bottom of the hooks with the marks on the wall,
Nail the hooks to the wall. Remember for heavier picture frames use a stud finder and nail into the wall stud for further strength.
Hang the frame on the wall by positioning the hanging wire over the picture hooks.
Be sure to check that the frame is level and centered per your design.
Conclusion:
After following the steps laid out in the article you can be confident in making sure your walls have a professional finish for years to come.
Make sure you check back soon for updates to the articles and new topics coming soon.
If you have any other tips or comments please leave them below so others can benefit.
If there are other topics you are interested in discussing or learning about please drop a note below in the comments section.